

In my previous post, I discovered I get a marginally better results using a higher dpi on my Canon scanner than using a Flip Pal. However, the resulting photo quality was not really much of an improvement on the Flip Pal. Is there anything else I can do to improve the photo quality?
I spent months experimenting and reading articles until I finally found a process that works well with the tools I have to hand.
Process
In the end, it was a pretty straightforward process:
-
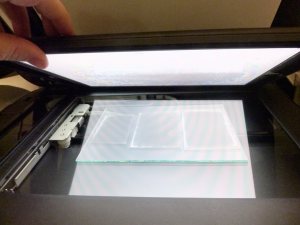
- Place the negatives onto the scanning bed
- Place a sheet of clear glass over the negatives to flatten any curling edges (click image)

- Shine a diffused light source above the negative:
- Set the brightness level on an iPad to a little above 50% (you may need to experiment with light levels depending on the state of your negatives and the type of scanner you are using)
- To get a clear light source, open a word processing program (e.g. Pages) and set it to a blank page; though you could also use a torch app or something similar
- Then place the iPad facedown on top of the negatives (click image)
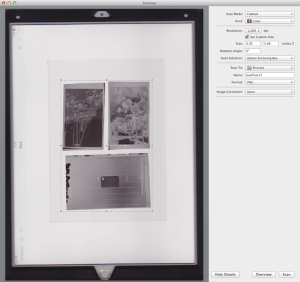
- Set up the scanner:
- Choose a dpi – preferably a high dpi for better detail
- Choose a file format – preferably tiff or png file format for better editing options
- Set to scan in colour
- See my settings in the image below (click on the image to see the setting details)
- Scan the negative
- Use a photo editing program to:
- Straighten and crop the image
- Invert the negative
- Convert the image to grayscale
- Adjust levels and contrast to your satisfaction
- Edit image to remove dust and scratches – optional


Pudding Proof
Below are the results of a number of negatives that have undergone my editing process. On the left is the original basic Canon scan; the middle image uses the additional steps listed above – up to “Scan the negative”; and the one on the right is after all the final tweaking of contrast and light, and cleaning up the dust and scratches.
Click on the images to view them in more detail.


As you can see, you can get some quite dramatic results by experimenting with editing software and light levels. It may not be professional quality, but the results are quite satisfactory for me. If you want a more professional result, this process may not be for you.
In case you want to know, the image editing software I use is the free version of Photoscape X. But there are all kinds of photo editing software out there – like Gimp or Photoshop Elements. I suggest you try some out until you find something that suits you.
What’s Next
I am in the process of writing a series of blog posts showcasing all of these WWI negatives belonging to my husband’s family friend, Dr John George Morris Beale. There are some amazing photos amongst his collection and you will be able to see the full photos from this post in all their glory. I will also write a post telling a little of the story of Dr Beale’s life. So keep an eye out – though don’t expect it any time soon. I’ve already spent many months on the research and it will take many more to do all of the research required.
Caveat
I’m not affiliated in any way with any of the products or brands mentioned except as a normal user. The purpose of this post is to experiment and see what is possible with the tools already at hand and is a reflection of my own personal opinions and experiences. Please undertake your own due diligence to decide whether any product meets your own requirements and expectations.


Another excellent post, what a good idea to use the ipad or any tablet as a light source, shall go back and try rescanning some negatives, thanks!
LikeLiked by 1 person
Thanks, Carmel. I hope you have fun trying this out.
LikeLike
Hello
I am from the other side of the pond!
I have a Flip Pal for portability, I am Android based, and Linux! not Apple
my photo app of choice is Irfanview can be installed AND run from a Thumb drive in Linux via WINE.
Thank you so much for showing me how to scan negatives with a Flip-Pal
LikeLike